You are currently browsing the tag archive for the ‘diy’ tag.
Tabi’s first birthday pictures are in, and I’m loving each and every one of them! Sako Pak of Sky Blue Seed Photography did a wonderful job capturing all of the special moments, both big and small. If you’re in need of a friendly, talented photographer, go to her website and see her beautiful work! Also, I must give a shout out to my dear friend, Amenda Beck Makeup Artist who did my makeup. She’s done makeup for fashion shows and for brides…she is one talented lady! I asked for a clean, natural look, and I loved the way it turned out. I would normally not pay to get my makeup done for a kid’s birthday party, but my old roomie said she would do it for me. I couldn’t pass that up! Thanks AB!
Before I start posting about the birthday, I just wanted to say hello to all the new subscribers to our blog 🙂 We’re hoping to transition to our new site very very soon! That’s our goal before the year ends!
Big sis and I have yet to post pictures of ourselves on our site, for various reasons. Well, that’s going out the window for 2012. We are so grateful to see our facebook fans growing, and we get so happy to meet you guys at the fairs. It’s only fair that you get to see who we are! You’ll see some pictures of me (lil sis) with my kiddos in this post, and big sis will show up eventually too.
Big sis and I are Korean, and in our tradition, the first birthday is a major event. The importance and the cultural meaning behind the first birthday also known as the dohl is what makes some of us CRAZY in the head when trying to plan the first birthday party. I hear many moms say planning their kid’s first birthday party is almost as stressful as planning a small wedding. Whether it’s being held at a hotel or at home, we are all just trying to make a memorable, joyful event for our little one.
We had Tabi’s first birthday party at Old Spaghetti Factory. This time around we kept it low key with around 60 guests versus Lila’s birthday which was a 100+ person party. There was no set banquet manager to help me, but all of the managers there were so accommodating. I worked with Erika, and she went above and beyond to help me out. What kind of venue lets you set up the night before until midnight!? It worked out perfectly because I didn’t hire anyone this time around to help me with decorations like I had for Lila’s birthday. Most of the stuff was DIY, and I am forever grateful to my girlfriends who helped me set up that evening because they pretty much did most of the work. I caught the 24 hour stomach virus that day, so I was ready to just collapse by the time evening came around. At one point I had to hold my head up with my hands because I felt so nauseous while they were both ironing my tablecloths. Worse timing to get sick!
Alrighty, on to to the pictures! This is going to be a picture overload post!
Private banquet room at OSF
Got this idea from the internet! I wish I can link to the site, but I don’t remember where I saw this. I loved the idea of taking pics of my daughter representing the items for the doljabi. The doljabi is a traditional game in which we have a variety of items laid out in front of the birthday girl/boy. The baby is encouraged to pick one of the items, and it’s believed that whatever he/she chooses is supposed to predict the child’s personality and future. Guests predict what the baby will choose and they enter a raffle. Tabi got to choose from the following (as shown in the picture above from left to right)
basketball ~ pictured in my husband’s alma mater outfit: athlete
microphone ~ pictured wearing her shades and singing in a mic: musician
money ~ pictured wearing big sis’ hand me down burberry dress given by a good friend of mine (thx rose) and holding up fake money: future baller
book ~ pictured reading a book: scholar
yarn ~ pictured playing with the yarn (couldn’t figure what to do with her on this one!): long and abundant life
btw, she chose money! cha-ching!
Yummy red velvet & vanilla cake pops made by Cats! The dol go ims (the traditional towers in the background made with beans) were also a project that I did about 3 weeks before the party. I didn’t have towers for Lila’s birthday, and I regret not making them for her so I had to make some this time around for Tabs. One tower says First Birthday (Chook Dol), the other is a tiger (Year of the White Tiger though I made a brown one), and the third one says her Korean Name (Chae Yeon). I took some pictures of the whole process, which I’ll post about later. There are some great tutorials on the internet on how to make dol go ims.
A Chalkboard fabric backdrop adorned with some felt flowers. I made one flower a night for a week w/ eco felt. Wool felt would have been better to work with because it’s stiffer, but I couldn’t get myself to spend the money on that felt. Instead, I just sprayed starch (used for ironing) on the felt and it made it a tad bit stiffer so the petals wouldn’t limp. The chalkboard fabric is hanging from the PVC pipe that the hubs made…again, a later post.
big sis’ made a big batch of these yummy mini cupcakes! i just glued some colorful paper strips on skewers to make some flags.
Paper placemat info here pictured with big sis’ daughter’s collection of squinkies.
flowers from la flower mart, fabric runner from joanns, floor length white polyester tablecloths from ebay member linentablecloths ($11 each). seriously i looked at every party supply store including party city. no one carries floor length tablecloths that are NOT PLASTIC.
glass vases were borrowed from friends. i had two short ones & two tall ones. i just cut up some white fabric into strips and knotted them around the vases. i added ribbon as well. i was really big on having different height levels, so i used a couple of boxes to make a stand for my cake stand. even a cake stand can have a stand! i wrapped wrapping paper (the white side) around a small pampers box for the bottom box. the smaller one above is an anthropologie gift box. i always ask for a gift box if i ever find myself buying something at anthro. their boxes are sooo pretty and super sturdy.
two days after the party, the peonies fully opened up and they looked so pretty. not so much here. 😦 there is a trick i found on the internet though! you spray some warm water on the peonies and it will help them open or you can dip the flower bud in a bowl of warm water. not sure if these tricks work, but it’s worth a try.
hello! that’s me, lil sis 🙂
i’m changing tabi into her traditional korean dress called a han bok. i’m so glad she didn’t rip off that headband like she does with all her hair clips. i’ve made so many clips for my girls, but she REFUSES to have one on her head.
the doljabi (btw, i’m addicted to picnik)
the girls’ birthdays are two days apart, so i got a cake for my three year old too. we had our guests sing happy bday to her as well. as you can see from the bottom left picture, lila was loving it.
the end!
No need to spend money on fancy scalloped paper for scrapbooking or for making a garland because it’s pretty darn easy to get the same look by making it yourself. All you need is:
*Plain paper (I just took a piece of paper from my printer – 8 1/2×11)
*Scissors
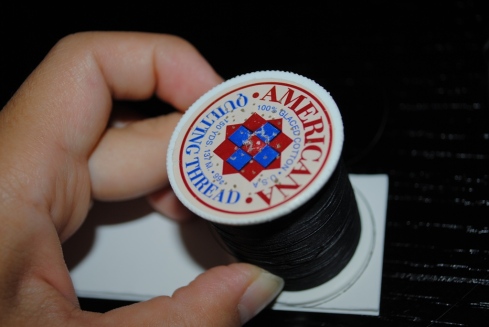
*Round shaped object to make your scallops (I used a spool of thread)
*Paper for tracing the scallops
1.) Fold your plain piece of paper into a strip. I didn’t do accordian style. I simply kept folding over. You can make your scallops wide by folding into larger strips or make them thin by folding into smaller strips.

2.) I had some extra paper remaining that I just cut off.

3.) Trace your round object on the edge of both sides of the strip. If you don’t have a spool of thread, you can use any object around the house – Tylenol Bottle, bottom of a vase, nail polish bottle, etc. Look in your bathroom…I’m sure you’ll find something!

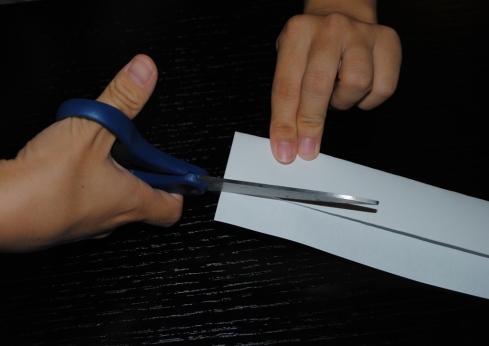
4.) Cut your scallops

5.) Your paper will look like this

6.) Begin tracing the scallops on your clean sheet of paper.
TIP #1: I didn’t trace directly on my scrapbook paper because I wanted to do a trial run first. I traced on a thicker piece of paper that I now use as my template.
Tip #2: Do not trace on the edges of the paper. Leave enough room so that you can trace the scallops on the sides as well.

7.) When you are ready to make the corners of the scallop, first make a line somewhat down the middle of the last scallop on your pattern (see my line on the white paper). That line should match up against where you stopped your tracing. This will be your guide to make the corner a perfect rounded circle. The corners are tricky so experiment. Maybe use a pencil instead of a pen?

8.) I made a 7×7 square template to make a photo garland.

The end.
P.S. I cut out circles with a scalloped edge as well for the garland, but I just made a template by drawing free hand. I used my square template to guide me, so I don’t really have a tute on that. After her birthday, this bad boy is going straight to her room!
lil sis
**Preview of the treat bags still in major progress**

lil sis


